PayCertify.js
Integrating to fraud prevention products is usually hard and demands a in depth learning curve of how each product does work, besides all specifics around the development and implementation process. Most of the times, merchants are dependent on huge development efforts, which makes fraud prevention to be perceived as something expensive, very technical and unaccomplishable. With that in mind, we have developed paycertify.js, an innovative JavaScript plugin that integrates to your checkout page, with a few lines of code, shifting the turnaround of implementation from weeks, and sometimes months, into few minutes of coding and configuration.
Most importantly, through paycertify.js you are able to create rulesets that define when you want to let transactions pass and be processed by the gateway, and when you would rather not let the transaction go through – and that never even touches the gateway, reducing your potential chargeback ratio drastically. The products that the plugin supports are:
- Kount;
- Frictionless 3D-Secure;
- Pay Button;
- Data Enrichment (coming soon!);
- Confirmations (coming soon!);
- Transaction Insurance (coming soon!);
In order to get started with paycertify.js, you need to follow a simple three step process, where the first two of them are purely configurations to your PayCertify account, and only the last step demands your development / engineering team to do small adjustments to your checkout page. Let’s get started!
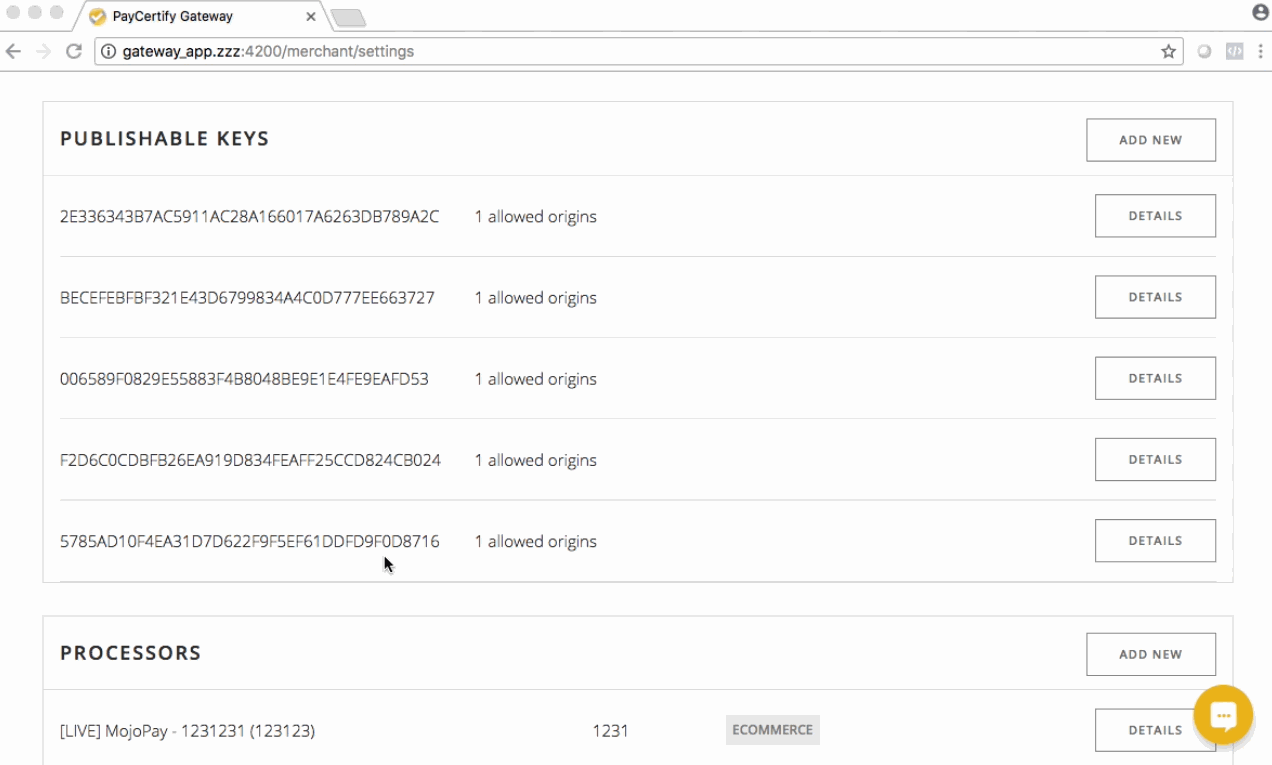
Generate a Publishable Key
In order to generate a publishable key, you will need a PayCertify account. After signing in with a merchant log in with admin privileges, you should be able to navigate to the “Settings” page of your account. Once you’re there, search for the “Publishable Keys” section and click “Add new”. After clicking on it, a right panel will pop up and there you should be able to fill the allowed origins, the mode and an URL to send over your users whenever one of your fraud checks fail.
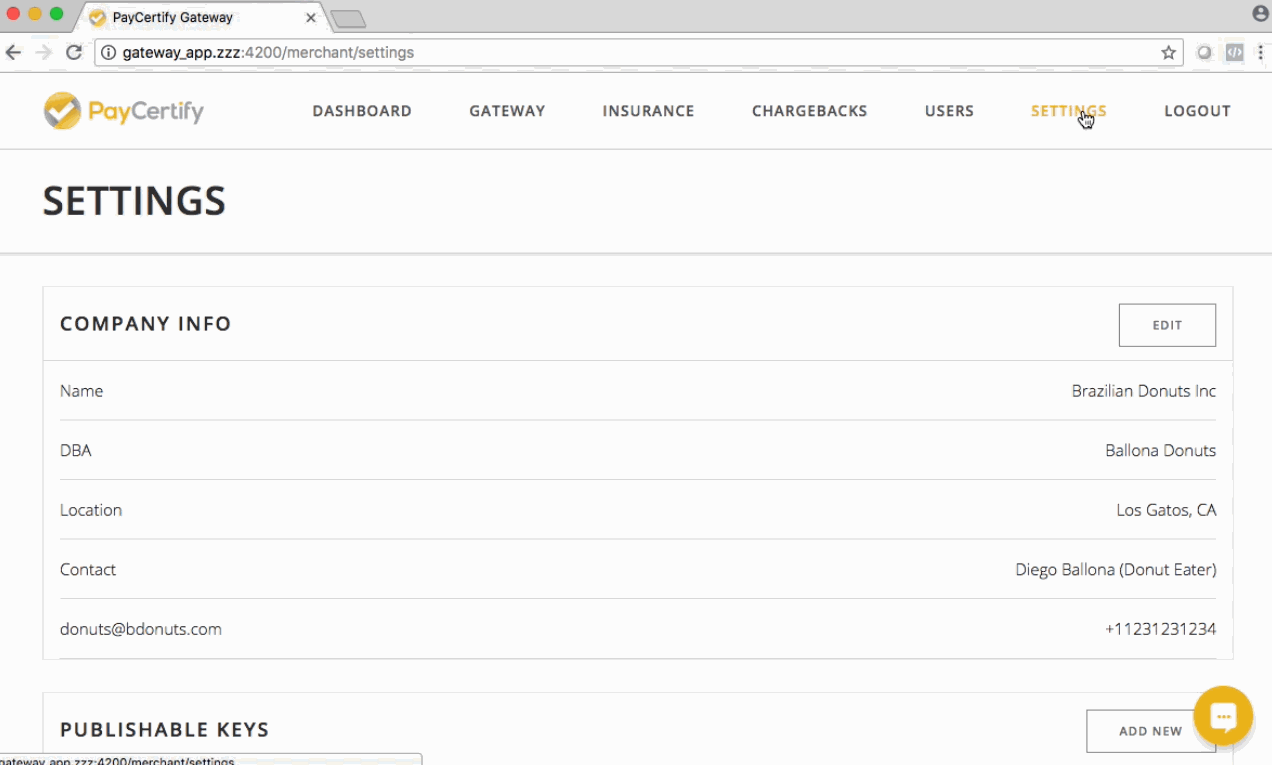
Since a publishable key is public and a tech-savvy customer could easily grab your key from your website’s HTML, you need to whitelist the domains you’d like to allow that key to work. You can create different keys for test and live environments, make sure to be as strict as you can for your live keys. Make sure to include the protocol when entering the allowed origins, that being either http or https, for example: https://paycertify.com,http://google.com. After you define the origins, pick “Test” mode as a starting point and enter an URL on your website/system that you want to send users that do not pass the rulesets. Hit save and your brand new key should be created!
After saving the key, you should be able to see a couple more options:
- If you would like to get more debugging information while on development phase, enable Logging;
- After that, enable which ever products you will be using from the list:
- To enable 3D-Secure, make sure to enter your 3DS public key into Settings > 3D-Secure Credentials;
- To enable Kount, make sure to enter your Kount Merchant ID and Kount API Key into Settings > Kount Credentials;
- To enable Pay Buttons, you will need at least one configured processor that supports it. Currently we only support Skrill for Pay Buttons.
After setting the credentials and enabling your products on your key, save it. Next up we’ll get you started with setting up the products you’re going to use.
Setup the Plugin
In order to set up the plugin, you’ll need to do two simple adjustments to your checkout page. First, you will need to link a script tag to the end of the <head> tag of your HTML, and then you should bind your checkout page inputs with data-paycertify attribute indicating which inputs are meant for which values.
Linking our script to your page
Grab the following snippet and paste it to the last line before closing the <head> tag on your page.
<script async src="https://js.paycertify.com/paycertify.min.js?key=YOUR_PUBLISHABLE_KEY&mode=test"></script>
Note that, alternatively, data attributes can be used to pass the data-key and data-mode values to the plugin.
<script async data-key="YOUR_PUBLISHABLE_KEY" data-mode=“test” src="https://js.paycertify.com/paycertify.min.js"></script>
After referencing the script on your checkout page, the next step is creating the proper bindings to your inputs.
Field data-attribute bindings
Now, in order to us detect which fields on your checkout page represent which parts of the data, we need you to flag them with a data-paycertify attribute, and it’s value reference a properly formated piece of data. Each product demands a different set of attributes to be defined, and these are pointed out in each one of the specific product setup sections below.
A sample, very minimalistic checkout page HTML could be represented through the following HTML:
<!doctype html>
<html>
  <head>
    <title>paycertify.js</title>
    <script async data-key="YOUR_PUBLISHABLE_KEY" data-mode=“test” src="https://js.paycertify.com/paycertify.min.js"></script>
  </head>
  <body>
    <h1> Checkout </h1>

    <form action="https://my.website.com/process-my-transaction" method="POST">
      <input type="hidden" data-paycertify="amount" value="1"/>

      <label>First Name</label><br/>
      <input type="text" data-paycertify="first-name"/><br/><br/>

      <label>Last Name</label><br/>
      <input type="text" data-paycertify="last-name"/><br/><br/>

      <label>Address</label><br/>
      <input type="text" data-paycertify="address-l1"/>
      <input type="text" data-paycertify="address-l2"/><br/><br/>

      <label>City</label><br/>
      <input type="text" data-paycertify="city"/><br/><br/>

      <label>State</label><br/>
      <input type="text" data-paycertify="state"/><br/><br/>

      <label>Country</label><br/>
      <input type="text" data-paycertify="country"/><br/><br/>

      <label>ZIP</label><br/>
      <input type="text" data-paycertify="zip"/><br/><br/>

      <label>Card Number</label><br/>
      <input type="text" data-paycertify="card-number"/><br/><br/>

      <label>Card Expiration</label><br/>
      <input type="text" data-paycertify="card-expiry-month"/>
      <input type="text" data-paycertify="card-expiry-year"/><br/><br/>

      <label>CVV</label><br/>
      <input type="text" data-paycertify="card-cvv"/><br/><br/>

      <input type="submit"/>
    </form>
  </body>
</html>
All the fields flagged as mandatory for the product that you have enabled must be sent with every request, otherwise this can lead to product usage with invalid data, which wouldn’t allow you to get the benefits from using the plugin, or even worse: declining every single transaction you try. Make sure to test your integration throughouly before going live.
Form Submission
Whenever the checkout form is submitted we bind input[type=submit] and button click events to preventDefault, and run all fraud checks required on the client-side, the browser, and also process the transaction automaticallly so you never touch sensitive data such as credit cards. On your form action’s backend, all you get are the responses, so the backend work is only parsing the response and handling your own application’s flow.
PS: If you are using a SPA front-end, you will have to trigger the form submission yourself through something similar to the snippet below:
<form class="form-horizontal" action="https://my.website.com/process-my-transaction" method="POST">
  <a onclick="mySubmit()"> CUSTOM SUBMIT </a>
</form>

<script>
  function mySubmit() {
    window.pcjs.submit().then(function() {
      // perform success action on your application's logic
    }).catch(function (error) {
      // handle fraud check failures such as a redirect to a specific page
    })
  }
</script>
Setup your products
After defining which products you want to use, enabling them on your publishable key configuration and linking our javascript plugin on your checkout HTML, you can add the required fields for the products as per the sections below. Each one of the products demand specific configuration and sometimes set up on the application that will be using it.
Pay Button Configuration
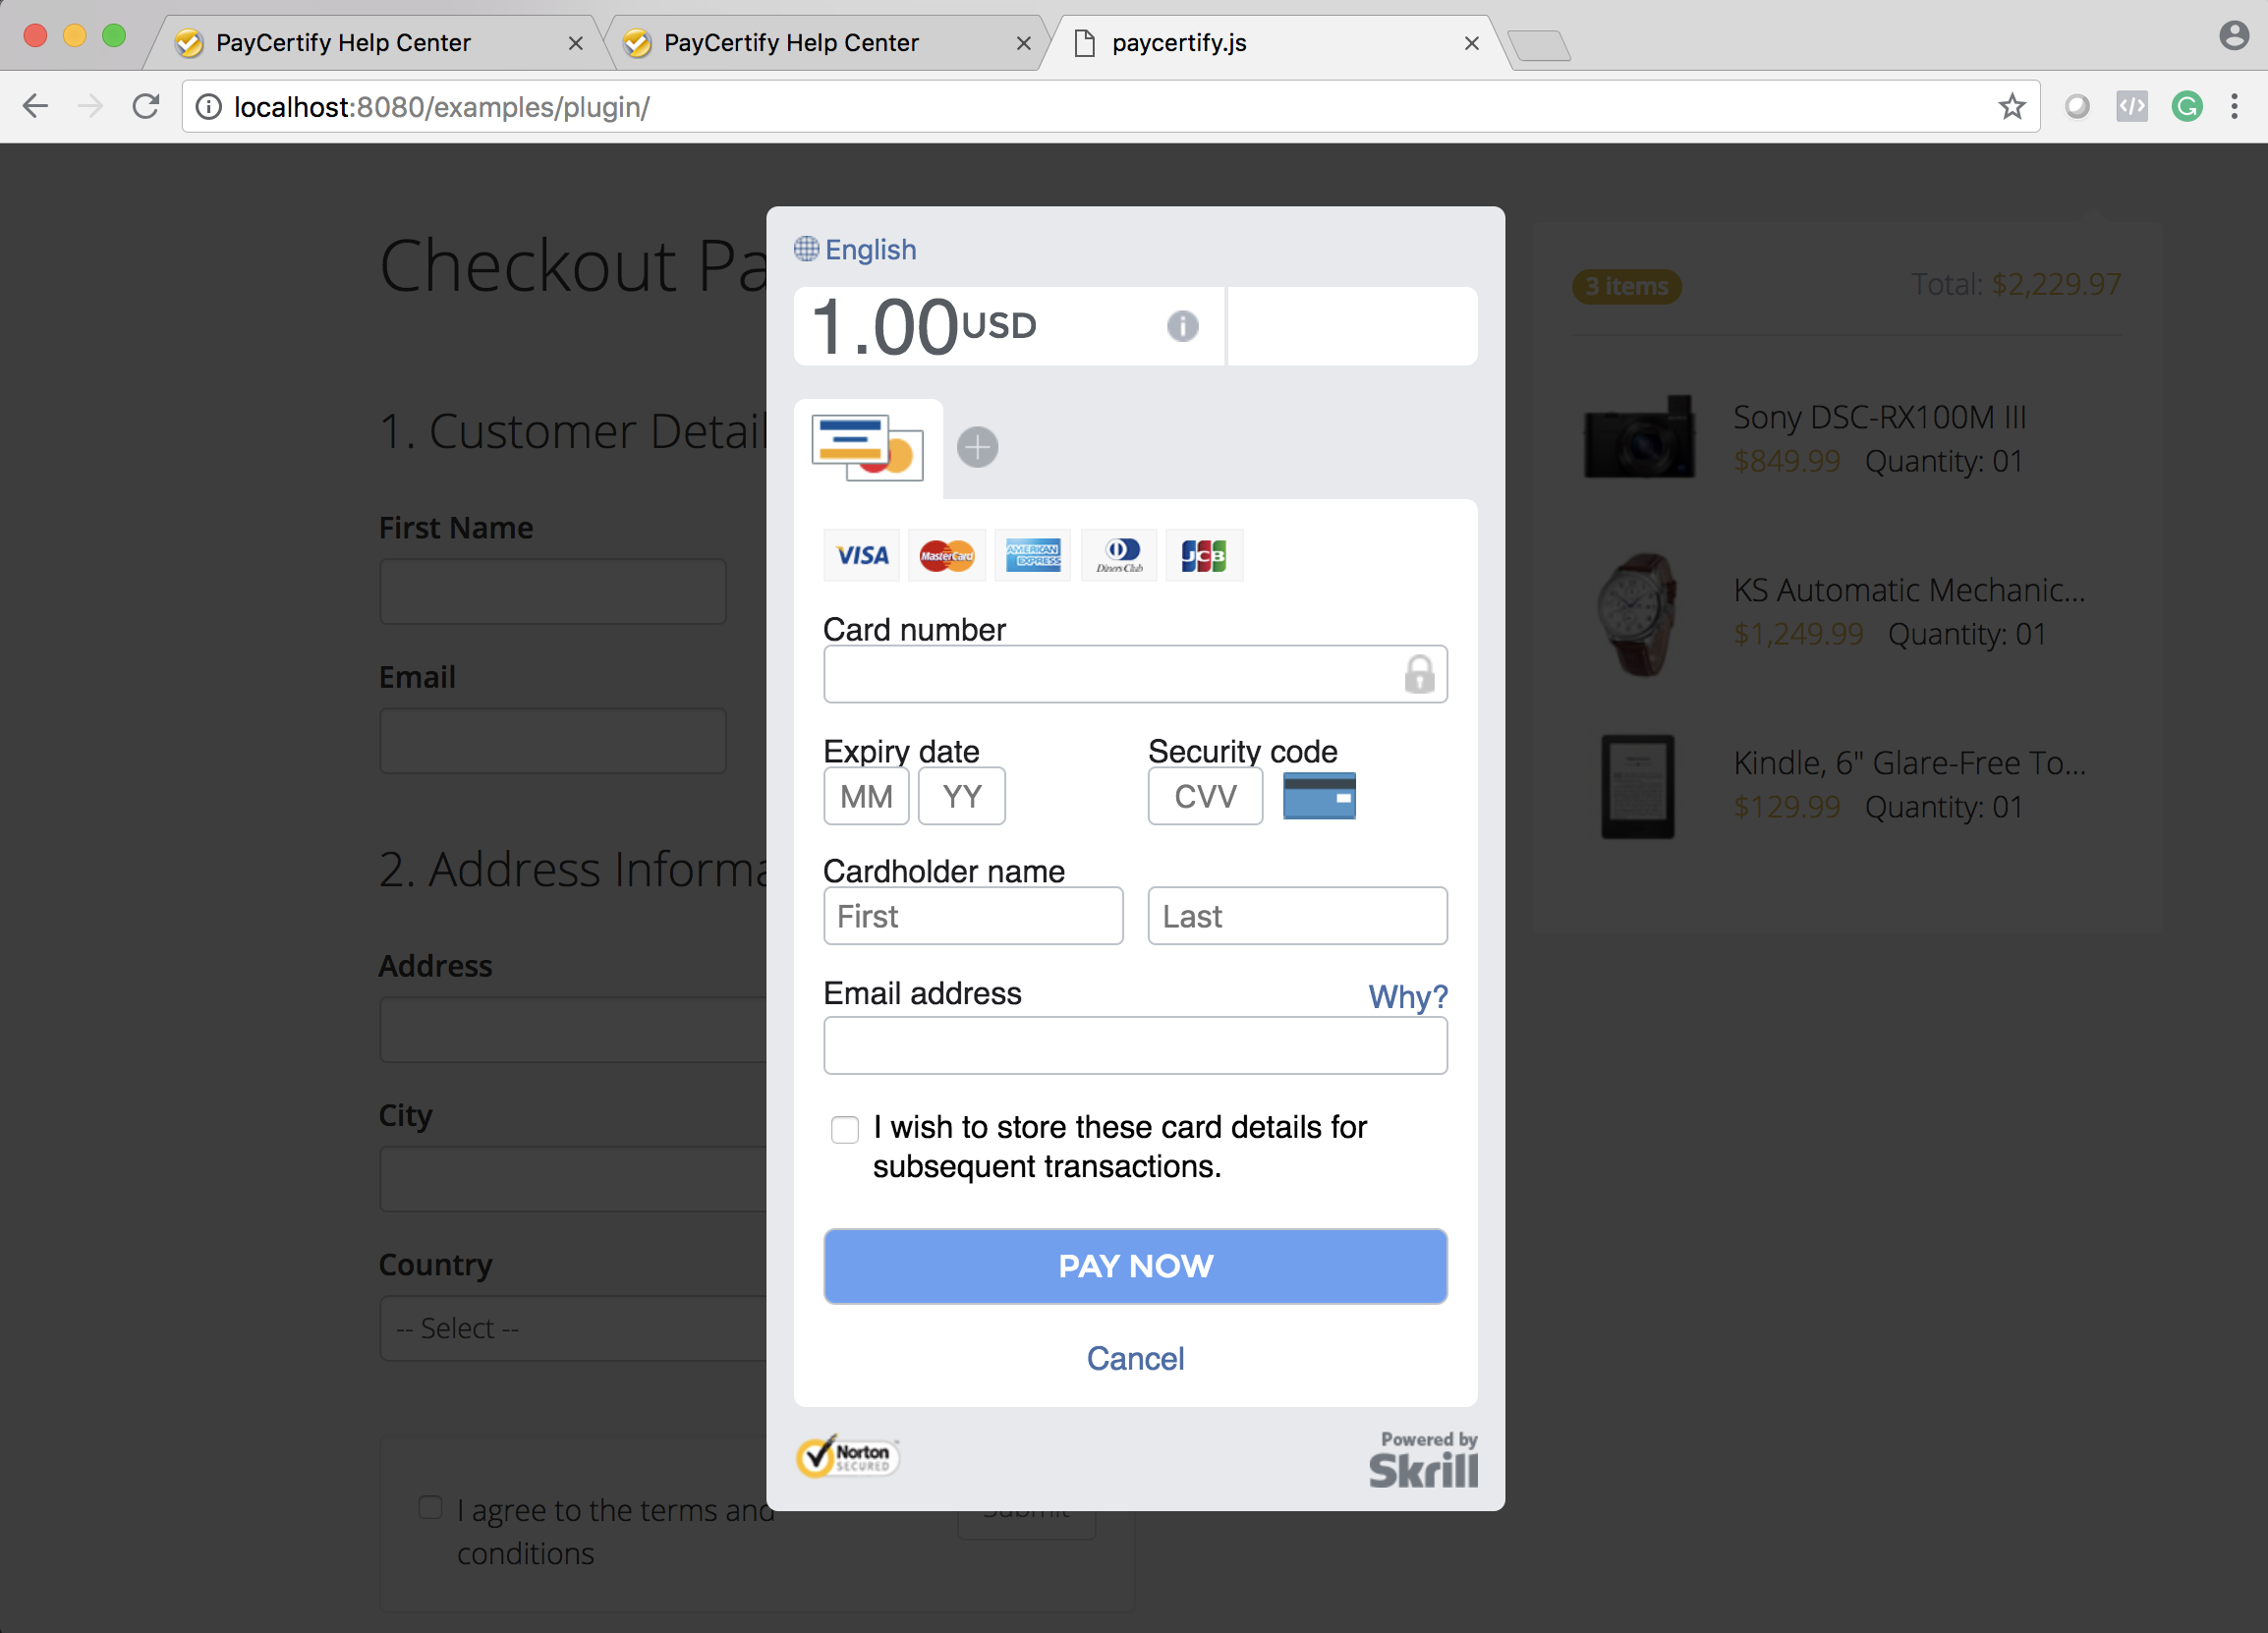
The Pay Buttons are a the easiest way of getting paid through PayCertify gateway and the processors we do support. Besides reduced implementation time, you don’t need to go through any PCI compliance scans or deal with its complexity since the sensitive data never touches your servers. In order to start using it, you just need to assign a few data attributes to your checkout page and then know the format that we’ll submit the transaction data to your website whenever the purchase is complete on the gateway to either approve or decline the transaction.
There are two methods the Pay Button uses to run transactions:
- For
internalprocessors: the card data is extracted your form and you are required to use card inputs to pass this data to the gateway directly; the transaction never touches your server as we intercept the event before letting your form being submitted; - For
externalprocessors, which happens offsite, being opened through a popup modal; in that case, the card data is input on an external environment, without taking the user off from your website.
All of our processors are internal, except Skrill.
Required checkout fields
Below is a list of the fields that this product uses:
| Data attribute | Presence | Description | Type |
|---|---|---|---|
[data-paycertify="processor-id"] |
Mandatory | The processor ID you would like to use on this transaction. | uuid, e.g.: 41f00869-d7b3-413e-9476-9ef1a8bc2f28 |
[data-paycertify="amount"] |
Mandatory | The amount of the transaction | a 2-decimal places number. e.g.: 0.01 |
[data-paycertify="first-name"] |
Mandatory | The first name of the customer | string, max 255 digits. e.g.: John |
[data-paycertify="last-name"] |
Mandatory | The last name of the customer | string, max 255 digits. e.g.: Doe |
[data-paycertify="card-number"] |
Conditional[1] | The credit card number | string, 12-19 digits. e.g.: 4111111111111111 |
[data-paycertify="card-expiry-month"] |
Conditional[1] | Card expiration month, in two digits | string, 2 digits. e.g.: 01 |
[data-paycertify="card-expiry-year"] |
Conditional[1] | Card expiration year, in four digits | string, 4 digits: e.g.: 2025 |
[data-paycertify="card-cvv"] |
Conditional[1] | Card’s security code, 3 or 4 digits | string, 3-4 digits: e.g.: 123 |
[data-paycertify="email"] |
Conditional[2] | The email of the customer | string, max 255 digits. e.g.: john@doe.com |
[data-paycertify="phone"] |
Conditional[2] | The phone number of the customer | string, max 255 digits, on international format or US format. e.g.: +11231231234 or 1231231234 |
[data-paycertify="address-l1"] |
Optional[3] | The first line of the billing address of the customer | string, e.g.: 59 North Santa Cruz Ave |
[data-paycertify="address-l2"] |
Optional | The second line of the billing address of the customer | string, e.g.: Suite M |
[data-paycertify="city"] |
Optional[3] | The billing city of the customer | string, e.g.: Los Gatos |
[data-paycertify="state"] |
Optional[3] | The billing state of the customer | string, ISO 3166-2 format. e.g.: CA |
[data-paycertify="country"] |
Optional[3] | The billing country of the customer | string, ISO 3166-1 alpha-2 format. e.g.: US |
[data-paycertify="zip"] |
Optional[3] | The billing zip of the customer | string, 5-6 alphanumeric digits |
[data-paycertify="shipping-address-l1"] |
Optional[4] | The first line of the shipping address of the customer | string |
[data-paycertify="shipping-address-l2"] |
Optional[4] | The second line of the shipping address of the customer | string |
[data-paycertify="shipping-city"] |
Optional[4] | The shipping city of the customer | string |
[data-paycertify="shipping-state"] |
Optional[4] | The shipping state of the customer | string |
[data-paycertify="shipping-country"] |
Optional[4] | The shipping country of the customer | string |
[data-paycertify="shipping-zip"] |
Optional[4] | The shipping zip of the customer | string, 5-6 alphanumeric digits |
[1] If the processor being used is external type, you should not use have these fields on your checkout page, otherwise they’re required.
[2] Some processors may require this information. Heavily recommended to use for high risk merchants.
[3] Fundamental for shipped goods and processor MojoPay requires it.
[4] Defaults to the billing address.
Form submission process
Whenever the checkout form is submitted and all the fraud tools rules pass, if you are using an external processor, you should see a black screen, with a modal be open, and the user should use the safe environment to finish the transaction. Otherwise, the entire process will happen on the background, directly from the data entered to your form.
Regardless of the processor integration method, after the payment is done by the customer, your customer will be redirected to your form’s action property through a POST request, regardless of the outcome (approval or decline).
Considering hypothetically that your form action is https://your-return-url.com/, this is how your the POST request would look like:
POST https://your-return-url.com/
Content-Type: application/x-www-form-urlencoded

transaction[id]: b50772b6-cb55-4514-b2bd-5201f971825c
transaction[merchant_id]: c68b45c4-0f9a-3758-ba2d-444819f564c7
transaction[user_id]: 939f14ec-26a2-4128-98c2-c55417defaf2
transaction[processor_id]: 38512ec8-3d17-45b5-a321-bf401f55e20a
transaction[merchant_transaction_id]: 123321312
transaction[transaction_type]: external
transaction[first_name]: Customer
transaction[last_name]: Last Name
transaction[street_address_1]: 123 Street
transaction[street_address_2]: Suite F
transaction[city]: Los Gatos
transaction[state]: CA
transaction[country]: US
transaction[zip]: 54321
transaction[email]: example@gmail.com
transaction[mobile_phone]: +11231231234
transaction[updated_at]: 2018-07-22T17:45:08+00:00
transaction[created_at]: 2018-07-22T17:39:27+00:00
transaction[events][0][id]: d48f5687-b79f-4251-bd1a-db10de997d91
transaction[events][0][success]: true
transaction[events][0][status]: pending_settlement
transaction[events][0][threeds_response]: null
transaction[events][0][avs_response]: null
transaction[events][0][event_type]: sale
transaction[events][0][amount]: 21.00
transaction[events][0][ip_address]: 127.0.0.1
transaction[events][0][processor_code]: 2
transaction[events][0][processor_message]: Processed
transaction[events][0][processor_transaction_id]: 2442738841
transaction[events][0][processor_threeds_response]: null
transaction[events][0][processor_avs_response]: null
transaction[events][0][updated_at]: 2018-07-22T17:45:09+00:00
transaction[events][0][created_at]: 2018-07-22T17:45:08+00:00
In order to know if a transaction was approved or not, use the transaction[events][0][success] attribute. Whenever that returns true, you should be approving the transaction on your side. Everything else should be considered a decline.
Refunding a transaction
A refund can either be done from your PayCertify account on GATEWAY > CARD TRANSACTIONS > DETAILS > ACTIONS, or through our API.
Kount Rule Configuration
Kount’s patented machine learning technology analyzes transactions to stop fraud and increase revenue for online businesses, merchants, acquiring banks, and payment service providers. Through it’s cutting edge technology, it checks thousands of data sources within seconds while generating a recommendation whether a transaction should be declined or not, given rulesets that you have the power to define in your PayCertify account.
Required checkout fields
Below is a list of the fields for using this product:
| Data attribute | Presence | Description | Type |
|---|---|---|---|
[data-paycertify="card-number"] |
Mandatory | The credit card number | string, 12-19 digits. e.g.: 4111111111111111 |
[data-paycertify="amount"] |
Mandatory | The amount of the transaction | a 2-decimal places number. e.g.: 0.01 |
[data-paycertify="first-name"] |
Mandatory | The first name of the customer | string, max 255 digits. e.g.: John |
[data-paycertify="last-name"] |
Mandatory | The last name of the customer | string, max 255 digits. e.g.: Doe |
[data-paycertify="email"] |
Mandatory | The email of the customer | string, max 255 digits. e.g.: john@doe.com |
[data-paycertify="phone"] |
Mandatory | The phone number of the customer | string, max 255 digits, on international format or US format. e.g.: +11231231234 or 1231231234 |
[data-paycertify="address-l1"] |
Recommended | The first line of the billing address of the customer | string, e.g.: 59 North Santa Cruz Ave |
[data-paycertify="address-l2"] |
Recommended | The second line of the billing address of the customer | string, e.g.: Suite M |
[data-paycertify="city"] |
Recommended | The billing city of the customer | string, e.g.: Los Gatos |
[data-paycertify="state"] |
Recommended | The billing state of the customer | string, ISO 3166-2 format. e.g.: CA |
[data-paycertify="country"] |
Recommended | The billing country of the customer | string, ISO 3166-1 alpha-2 format. e.g.: US |
[data-paycertify="zip"] |
Recommended | The billing zip of the customer | string, 5-6 alphanumeric digits |
[data-paycertify="shipping-address-l1"] |
Optional defaults to Billing Address |
The first line of the shipping address of the customer | string |
[data-paycertify="shipping-address-l2"] |
Optional defaults to Billing Address |
The second line of the shipping address of the customer | string |
[data-paycertify="shipping-city"] |
Optional[1] | The shipping city of the customer | string |
[data-paycertify="shipping-state"] |
Optional[1] | The shipping state of the customer | string |
[data-paycertify="shipping-country"] |
Optional[1] | The shipping country of the customer | string |
[data-paycertify="shipping-zip"] |
Optional[1] | The shipping zip of the customer | string |
[1] Defaults to the shipping address provided.
Ruleset configuration
You will also need to set up a ruleset for Kount on your publishable key configuration. By default we offer the following rulesets:
- Very strict ruleset If you want to allow only the transactions that Kount™ recommends as safe;
- Strict ruleset You can also establish a “cut” on the
SCORproperty. Usually anything over 50 is risky; - Permissive ruleset Only rejects transactions that
SCORthreshold is very high and Kount explicitly declines. - Custom ruleset Through our rule operators, you can use the following list of the parameters and example values that you will get from a Kount response to create your own ruleset:
| Property | Description | Possible Values |
|---|---|---|
AUTO |
Auto-recommendation / decision response code. | A = ApproveD = DeclineR = ReviewE = Escalate |
OS |
Operating System | Can include the Windows, Mac, Android, iOS, and so on |
DSR |
Device screen resolution | 1024x768 |
UAS |
User agent string | Mozilla/5.0 (Windows NT 6.1; Win64; x64; rv:47.0) Gecko/20100101 Firefox/47.0 |
BRND |
Brand of credit card used | VISA = VISAMSTR = MasterCardAMEX = AmericanExpressDISC = Discover |
DDFS |
Date device first seen | 2013-07-19 |
GEOX |
Persona related country with highest probability of fraud | ISO 3166-1 alpha-2 Country Code such as US, CA, etc |
KAPT |
Whether or not device data was collected by the Data Collector process | Y or N |
MERC |
Kount Merchant ID | A six number string: 123123 |
MODE |
Specifies what mode type the RIS post is | Q, P, X, U, E |
NETW |
Riskiest network type associated with persona within the last 14 days. | A = AnonymousH = High SchoolL = LibraryN = NormalO = Open ProxyP = PrisonS = Satellite |
ORDR |
Merchant’s Order Number | 12312312313 |
REGN |
Region associated to Device Location | US_IA |
SCOR |
Kount score | A number ranging from 1 to 99. The greater, the riskier the transaction is. |
SESS |
Unique session ID | A random string: 345cd05ebd1b48a683f3beb40342df7b |
SITE |
Website identifier of where order originated | DEFAULT |
TRAN |
Kount transaction ID number | 7MYJ00SDJQ0D |
VELO |
Quantity of orders seen from persona within last 14 days. | A number ranging from 0 to 100 |
VERS |
Specifies version of Kount, built into SDK, must be supplied by merchant if not using the SDK | 0630 |
VMAX |
Quantity of orders from persona within the most active 6 hour window in last 14 days. | A number ranging from 0 to 100 |
CARDS |
Total number of credit cards associated to persona as seen by Kount | A number ranging from 0 to 100 |
FLASH |
A flag to indicate if the device placing order has ’flash’ enabled or not | Y or N |
PROXY |
Was a proxy server detected with this order | Y or N |
EMAILS |
Total number of unique email addresses associated to persona as seen by Kount | A number ranging from 0 to 100 |
IP_LAT |
Latitude of proxy IP address | -90.1922 |
IP_LON |
Longitude of proxy IP address | 38.6312 |
IP_ORG |
Owner of IP address or address block | ISP name, such as Comcast |
REGION |
Region associated to GEOX Location | ISO 3166-1 alpha-2 Country Code such as US, CA, etc |
BROWSER |
Web browser | A string containing Chrome, Firefox, Internet Explorer, etc |
COOKIES |
A flag to indicate if the device placing order has ’cookies’ enabled or not | Y or N |
COUNTRY |
Two character ISO country code associated with the physical device | ISO 3166-1 alpha-2 Country Code such as US, CA, etc |
DEVICES |
Total number of unique devices associated to persona as seen by Kount | A number ranging from 0 to 100 |
IP_CITY |
City of proxy IP address | Los Angeles |
IP_IPAD |
IP address of proxy | 127.0.0.1 |
PIP_LAT |
Latitude of pierced IP address | -90.1922 |
PIP_LON |
Longitude of pierced IP address | 38.6312 |
PIP_ORG |
Owner of pierced IP address or address block | Verizon |
LANGUAGE |
The language the device owner has set in the device’s Control Panel | EN |
PIP_CITY |
City of pierced IP address | Los Angeles |
PIP_IPAD |
Pierced IP address | 127.0.0.2 |
PIP_COUNTRY |
Country of pierced IP address | ISO 3166-1 alpha-2 Country Code such as US, CA, etc |
PIP_REGION |
State/Region of pierced IP address | ISO 3166-2 State Code such as TX |
TIMEZONE |
The timezone the device owner has set in the device’s Control Panel. The value listed represents the number of minutes from Greenwich Meantime. Divide by 60 to get number of hours. | 420 |
IP_REGION |
State/Region of proxy IP address | TX |
LOCALTIME |
The local time the device owner has set in the device’s Control Panel | 2013-07-23 22:04:57 |
PC_REMOTE |
Is the device enabled to use PC Remote software | Y or N |
IP_COUNTRY |
Country of proxy IP address | ISO 3166-1 alpha-2 Country Code such as US, CA, etc |
JAVASCRIPT |
A flag to indicate if the device placing order has ’javascript’ enabled or not | Y or N |
FINGERPRINT |
The unique fingerprint of the device placing the order | 00482B9BED15A272730FCB590FFEBDDD |
MOBILE_TYPE |
If a mobile device, the brand / type / operational system | Can include iPhone, Android, Blackberry, iPad, etc |
HTTP_COUNTRY |
User Home country the device owner has set in the device’s Control Panel | ISO 3166-1 alpha-2 Country Code such as US, CA, etc |
VOICE_DEVICE |
Is the device voice activated (related to mobile devices) | Y or N |
DEVICE_LAYERS |
5 device layers representing the operating system, browser, javascript settings, cookie setting and flash settings. Device layers are used to create the device fingerprint. | D67BC18BAD.6EF0902E51.8C96FA9E7B.61FD602D96.940A6D1454 |
MOBILE_DEVICE |
Is the device placing the order a mobile device | Y or N |
MOBILE_FORWARDER |
If device is mobile, is it using a forwarder to process the carrier’s service | Y or N |
RULES_TRIGGERED |
Number of rules triggered by the RIS post | A number ranging from 0 to 100 |
3D-Secure Rule Configuration
3D-Secure is a protocol designed to be an additional security layer for online credit and debit card transactions. It was first deployed by Visa with the intention of improving the security of Internet payments and is offered to customers under the name Verified by Visa. Services based on the protocol have also been adopted by MasterCard, JCB International, American Express and Discover.
Required checkout fields
Below is a list of the fields for using this product:
| Data attribute | Presence | Description | Type |
|---|---|---|---|
[data-paycertify="amount"] |
Mandatory | The amount of the transaction | a 2-decimal places number. e.g.: 0.01 |
[data-paycertify="card-number"] |
Mandatory | The credit card number | string, 12-19 digits. e.g.: 4111111111111111 |
[data-paycertify="card-expiry-month"] |
Mandatory | Card expiration month, in two digits | string, 2 digits. e.g.: 01 |
[data-paycertify="card-expiry-year"] |
Mandatory | Card expiration year, in four digits | string, 4 digits: e.g.: 2025 |
Test Cards
In order to run test 3D-Secure checks, use the following cards with any expiration date in the future for different outcomes:
| Card Number | Issuer | Prompt[1] | Success[2] | Eci | Status |
|---|---|---|---|---|---|
| 4111111111111111 | Visa | N | Y | 6 | Y |
| 4916909992637469 | Visa | Y | ? | ? | ? |
| 4000111111111115 | Visa | N | N | 7 | N |
| 5555555555554444 | Mastercard | N | Y | 2 | Y |
| 2223000048400011 | Mastercard | Y | ? | ? | ? |
| 5105105105105100 | Mastercard | N | N | 0 | N |
[1] Prompt means that if you were using the strict mode, the user would be shown a pop-up to confirm his information.
[2] Success means if the 3D-Secure check succeeded or not.
Ruleset configuration
By default we offer the following rulesets:
- Very strict ruleset If you want to allow solely the transactions where the liability has been shifted to the bank;
- Strict ruleset If you to let pass transactions that were successfully 3D-Secure’d (not necessarily shifted);
- Permissive ruleset Just enabling the product will give you a permissive approach to 3D-Secure;
- Custom ruleset Through our rule operators, you can use the following list of the parameters and example values that you will get from a 3D-Secure response to create your own ruleset:
| Property | Description | Possible Values |
|---|---|---|
xid |
3DS Internal Transaction ID. Should be forwarded to the gateway for liability shift. | 012312312314323 |
eci |
Electronic Commerce Indicator – shows if the Liability of this transaction was shifted or not to the bank | 02 or 05 = 3DS authentication succeeded and liability shifted;01 or 06 = 3DS authentication attempted, but was not or could not be completed;00 or 07 = 3DS authentication failed or could not be attempted; Card and/or issuing bank are not secured by 3DS, technical errors, or improper configuration. |
cavv |
Cardholder Authentication Verification Value. Base64 string – should be forwarded to the gateway for the liability shift. | ICAgICAgICAgICAgICAgICAgICA= |
status |
Request status and liability indicator. | Y = SucceededA = Attempted, not necessarily completed / succeededU = Unknown, potentially unavailability at card brand or issuing bank levelN = Not authenticated |
Forwarding data to the Gateway
Whenever your customer submits the form, after the ruleset is applied and you get a positive verdict, the form should be submitted to the form action you have defined. In that moment, you should receive the parameters needed to perform a 3D-Secure transaction on your form action:
| Property | Type | Length | Description | Possible Values |
|---|---|---|---|---|
threeds_xid |
string |
1-255 | Base-64 encoded Transaction ID | MDAwMDAwMDAwMDEyMzQ2Njc4OTA= |
threeds_eci |
string |
2 | Electronic commerce indicator. | 05 |
threeds_cavv |
string |
1-255 | Cardholder authentication verification value. | jI3JBkkaQ1p8CBAAABy0CHUAAAA= |
threeds_status |
string |
1 | Result of 3DS request. | Y, N, A, U |
- If you’re using our gateway direct API integration, refer to this page for more info;
- If you’re using our Pay Buttons, that process should happen automatically.
- If you’re using other gateways or payment providers, please reach out to our support for more information on 3D-Secure for your gateway and see how we can help on that.
Appendix
This section groups misc data for further customization of your checkout page. The following content is not necessary to start using paycertify.js and its audience is people who are looking into using the full capabilities of our plugin by creating more sensitive and complex rulesets.
Ruleset basics
Most of our fraud tools have rulesets for each one of the products you have activated under your account. These rulesets will define if a transaction should be forwarded to the gateway, or if it should be blocked. We give you the control on what you want to block, and consequently, what you want to let pass. All that is done through a logical formula that you will build, after getting to know how each product works. When your customer clicks to finish their checkout process and submits the form with their address, credit card data and personal information, we evaluate the response that we got for each one of the products being used, and use your rules to either allow the transaction to pass or not. Here’s an example:
Let’s say you are using Kount™. For every Kount request made, you get a response with a set of data, including a fraud score, the user’s network data, proxy data, geolocation data, and a verdict from Kount if they recommend you to allow that transaction to go through or not. Here’s an example response:
{
  "AUTO":"D",
  "SCOR":98,
  "GEOX":"BR",
  "BRND":"NONE"
}
So given that set of data, we clearly see that:
- The
AUTOvalue is “D”; BRNDvalue is “NONE”;SCORis 98, and so on.
On that data structure, whatever is to the left side of the semi-colon are parameters and the right side of the semi-colons are values. The parameters do not change for each customer we’re evaluating – these parameters will always be returned by Kount™. What changes on a customer and sale basis are the values, which Kount (and any other product being used) has a dictionary to translate what they’re trying to tell us. Each pair of parameters and values define a condition that the fraud prevention tool is letting us know about.
For example, Kount’s automatic recommendation always comes back on the AUTO parameter. Whenever they send back a “D” on that field, that means “Decline”. So if you are following strictly Kount’s recommendations, you would want to create a rule that says the following:
Decline any transaction that Kount responds with the AUTO parameter having its value equals to "D"
Now, in order to inform the system of that you will need to create a logical expression, using one of the operators below:
| Operator | Name | Meaning |
|---|---|---|
= |
Equals to | Parameter is exactly the same as the value |
!= |
Not Equals to | Parameter is not equal to the value |
> |
Bigger than | Parameter is greater than the value |
>= |
Bigger than or equals to | Parameter is greater than or equal to the value |
< |
Smaller than | Parameter is lesser than the value |
<= |
Smaller than or equals to | Parameter is lesser than or equal to the value |
So in that case, the rule you’d like to insert to the system is:
AUTO = "D"
In that this above, you have
AUTOas the parameter;=as the operator;"D"as the value;
An example of use of other operators: the SCOR parameter represents a fraud score given by Kount™ to that transaction. The greater it is, greater is also the fraud propensity of that transaction. So in the case that you want to block any transactions that have a score greater than 50, you would create a rule like this:
Decline any transactions that have a SCOR greater than 50
Or, in a logical expression:
SCOR > 50
These operators are the main and most used ones, and the majority of our merchants do not need to use more than that – still, if you want to create more complex rules, check the appendix section for Advanced Operators.
Now, in order to create your first rule, we’ll get back where we left on Generate a Publishable Key Section. In that page you have the ability to enter rulesets for each one of the products. To set up a rule, click on the “Details” button for one of the keys. There you can use presets for rules, or just create a custom rule for each product. After choosing one of the options, apply the rule set and you should be good to go: that rule is immediately applied all of your checkout pages using this publishable key.
Keep in mind that when creating your rules, you should always write rules that will block a transaction from happening, so the condition to be matched needs to be what parameters and values pairs you want to block.
Next up we’ll list all the possible parameters and known values for each one of the products you can use with our Javascript Plugin. As a starting point, our system will suggest the simplest rulesets for you. If you’d like to dig in and understand which parameters are the best, keep reading below. Otherwise, you can just jump directly to the final section of this documentation on how to Setup the Plugin on your checkout page.
Advanced operators
Logic operators represent a logical expression and always return a true or false value. They can be used as a standalone rule for your rulesets, meaning just one of these will evaluate properly to a “pass” or “decline” message.
| Operator | Usage | Explanation | Example |
|---|---|---|---|
IF |
IF([param] [operator] [value], [when true], [when false]) |
When the first condition is evaluated as true, the second condition is triggered. If the first condition is evaluated as false, then the third condition is triggered. | IF(SCOR > 50, (AUTO = "D"), (AUTO = "E")) |
AND |
AND(([param1] [operator1] [value1]), ([param2] [operator1] [value2])) |
Evaluates both conditions. If the first is truthy, the second also needs to be, otherwise it will return false. | AND((SCOR > 50), (AUTO = "D")) |
OR |
OR(([param1] [operator1] [value1]), ([param2] [operator2] [value2])) |
Evaluates one or the other condition. If any of the conditions evaluates as true, returns true. | OR((SCOR > 50), (AUTO = "D")) |
CONTAINS |
CONTAINS([value], [param]) |
Evaluates if the parameter includes the value. If yes, retuns true. | CONTAINS("CERT", TEXT) when parameter TEXT = “PAYCERTIFY” |
Numeric operators work with mathematical expressions and return a number. They cannot be used as a standalone rule for your rulesets, meaning you will need to evaluate the results of these operatios (numbers) with either a comparison or a logical to properly transimit a “pass” or “decline”.
| Operator | Usage | Explanation | Example |
|---|---|---|---|
MIN |
MIN([param1], [param2]) |
Returns the lesser of both numbers. | MIN(10,20) will return 10 |
MAX |
MAX([param1], [param2]) |
Returns the greater of both numbers. | MAX(10,20) will return 20 |
SUM |
SUM([param1], [param2]) |
Returns the sum of both numbers. | SUM(10,20) will return 30 |
AVG |
AVG([param1], [param2]) |
Returns the average for numbers. | AVG(10,20) will return 15 |
ROUND |
ROUND([param]) |
Rounds the number to the closest integer. | ROUND(1.4) will return 1 while ROUND(1.6) will return 2 |
ROUNDUP |
ROUNDUP([param]) |
Rounds the number up to the closest integer. | ROUNDUP(1.3) will return 2 |
ROUNDDOWN |
ROUNDDOWN([param]) |
Rounds the number down to the closest integer. | ROUNDDOWN(1.3) will return 1 |